Submission Kit Reference
Introduction
The Submission Kit is a tool available in the Companion App.
While Conductor provides plugins for several DCCs, including Maya, Nuke, and Cinema 4D, we also have applications installed in the cloud for which there are no native submitter plugins. Among these are Blender, Katana, and Silhouette. See the complete list of supported software here.
The Submission Kit helps you construct submissions for these applications without writing code. Python API developers may also find the Submission Kit helpful for rapid prototyping.
Note
If you want to submit from Maya, Nuke, or one of the other popular DCCs, we suggest using one of the native plugins. The Submission Kit is more flexible than the native submitters, but this comes with more opportunities to make mistakes. At the very least, you should understand the command-line options for your renderer of choice.
Note
If you are looking to get up and running quickly, check out some of our example tutorials.
The UI
The purpose of the submission kit is to generate a JSON payload containing the properties and data needed to render your job. These include assets, hardware, software, and the remote environment.
The General, Files, Software, and Environment panels in the Submission Kit give you control over these properties and help you to construct a valid submission for any host DCC without the need to write code. You can view the raw submission object at any time in the Preview panel before submitting it to Conductor.
The sections below cover each of these panels in detail.
General
The General tab contains some essential variables and settings for job submissions.
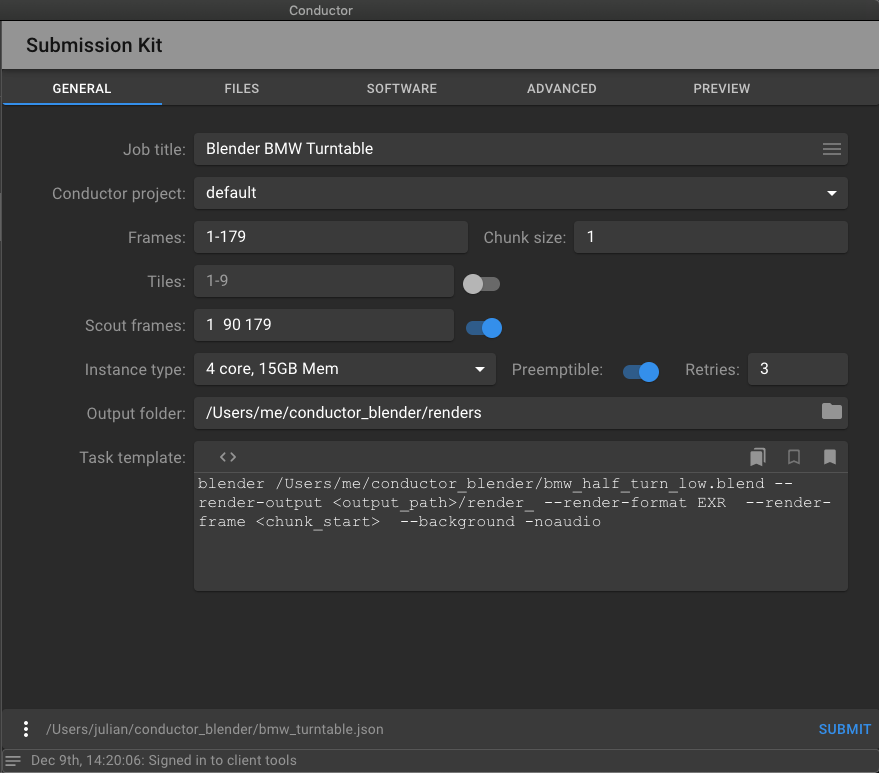
Job Title
The job title appears on the Conductor dashboard.
Conductor project
The project helps you to organize your submissions. The menu is populated when the companion app starts.
Frames
Enter one or more arithmetic progressions separated by spaces or commas to specify frames. This may be a simple range like 1-100. It's also possible to specify any arbitrary set of frames. Example:
1,7,10-20, 30-60x3, 1001 1050
See the Task template section below to understand how frames affect the generation of task commands.
Chunk size
A chunk is the set of frames handled by one task. If your renders are reasonably fast, it may make sense to render many frames per task because the time it takes to spin up instances, and sync can be significant by comparison.
You can refer to each chunk's first and last frame with the <chunk_start> and <chunk_end> tokens.
Tiles
The Tiles field allows you to take advantage of tiling features within your DCC. A task is generated for every tile number for every frame (or chunk). You specify tiles in the same way you specify frames. For example, to generate 9 tile numbers, enter 1-9. If you specify ten frames and nine tiles, you'll get 90 tasks.
Scout Frames
Scout frames are numbers that indicate a set of tasks to render immediately. When the submission reaches Conductor, we only start those tasks indicated by the specified scout frames. Other tasks go into to a holding state. The purpose of scout frames is to allow checking your render quality before incurring costs for a whole sequence.
Note
If chunk_size is above one, you may find extra rendered frames besides those listed as scout frames. The smallest unit of execution is a task, and there is no way to specify that part of a task should execute while another part held.
Instance Type
Specify the hardware configuration used to run your tasks. You are encouraged to run tests to find the most cost-efficient combination that meets your deadline. You can read about hardware choices and how they affect costs in this blog post.
Preemptible
Preemptible instances are less expensive to run than non-preemptible. The drawback is that they may be stopped at any time by the cloud provider. The probability of a preemption rises with the duration of the task. Conductor does not support checkpointing, so if a preemption occurs, the task starts from scratch on another instance. It is possible to change the preemptible setting in the dashboard for your account.
Automatic Retries
A task may fail if the command returns a non-zero exit code or is preempted by the cloud provider. Set a value above 0 if you would like to try the task again in either of these situations automatically.
Output path
Specify the location where files are written to. When tasks are complete, you'll be able to download rendered files to this folder on your computer.
There are some constraints to be aware of:
- All files produced by the job must be written to a location below the
output_path, otherwise they won't be available. - None of the assets you upload may exist anywhere below the output path.
Task Template
Use this text area to construct the commands to run on remote instances. Naturally, you want each task to be different, for example, render -f1, render -f2, .... render -f100. We provide a set of tokens to include in the template to achieve this. Tokens resolve to values derived from various settings such as Frames, Chunk size, Output-path, and others. Tokens are wrapped in angle brackets <...>
Available Tokens
| Token name | Example value | Scope | Description |
|---|---|---|---|
| chunk_spec | Task | 1-3x2 | Frame spec describing the start, end, and step frames for each task. |
| chunk_start | Task | 1 | Start frame for each task. |
| chunk_end | Task | 3 | End frame for each task. |
| chunk_step | Task | 1 | Step value for each task. |
| tile | Task | 2 | Tile value for each task if used. |
| scene | Job | /proj/scenes/myscene.ma | The scene name. This value is derived from whichever asset is tagged as the scene in the Files tab. Since Conductor render nodes run on Linux, the path is be made Posix compliant. For example, D:\proj\scenes\myscene.ma is converted to /proj/scenes/myscene.ma |
| output_path | Job | /proj/renders | The output folder. This value is derived from the Output path field. Since Conductor render nodes run on Linux, the path is made Posix compliant. For example, D:\proj\renders is converted to /proj/renders |
| sequence_spec | Job | 1-100x2 | Frame spec describing the start, end, and step frames for the entire job. This value is rarely used. |
| sequence_start | Job | 1 | Start frame for the job. This value is rarely used. |
| sequence_end | Job | 100 | End frame for the job. This value is rarely used. |
| sequence_step | Job | 1 | Step framevalue for the job. This value is rarely used. |
Token modifiers
Currently, there is one token modifier: pad, which you can use to pad numeric tokens.
For example, /my_shot.<pad chunk_start 4>.rib resolves to: /my_shot.0001.rib, /my_shot.0002.rib and so on.
Files
Use the Files tab to specify assets on which the submission depends.

File actions
- Select or deselect all assets.
- Remove selected assets from the list.
- Tag the first selected asset as the scene asset. This allows you to refer to the scene file in the task template with the
<scene>token. - Browse for file assets. You can select multiple assets from the file browser.
- Browse for directory assets. Due to a limitation, you can only choose one directory at a time.
Software
Use the Software tab to select your software and plugins. You must specify all the host software and plugin services you need to be made available to the render nodes.
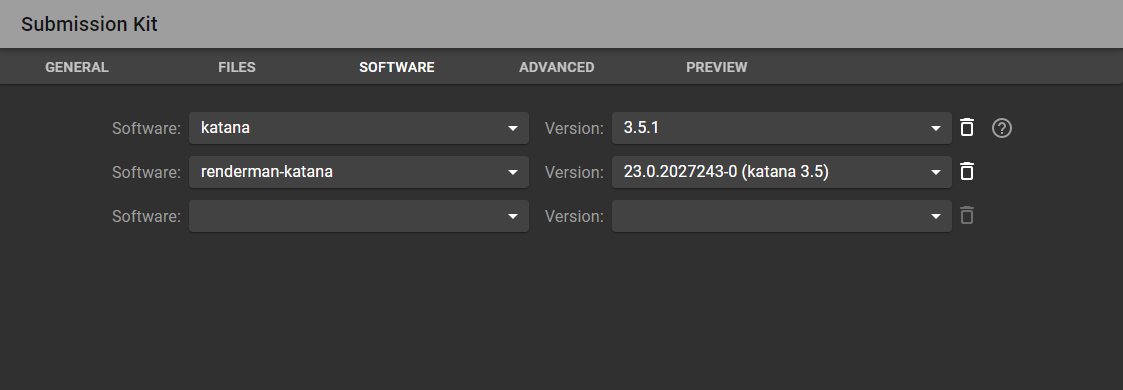
After selecting the appropriate versions, you can check the Preview tab to see that the environment section contains the required software paths.
Environment
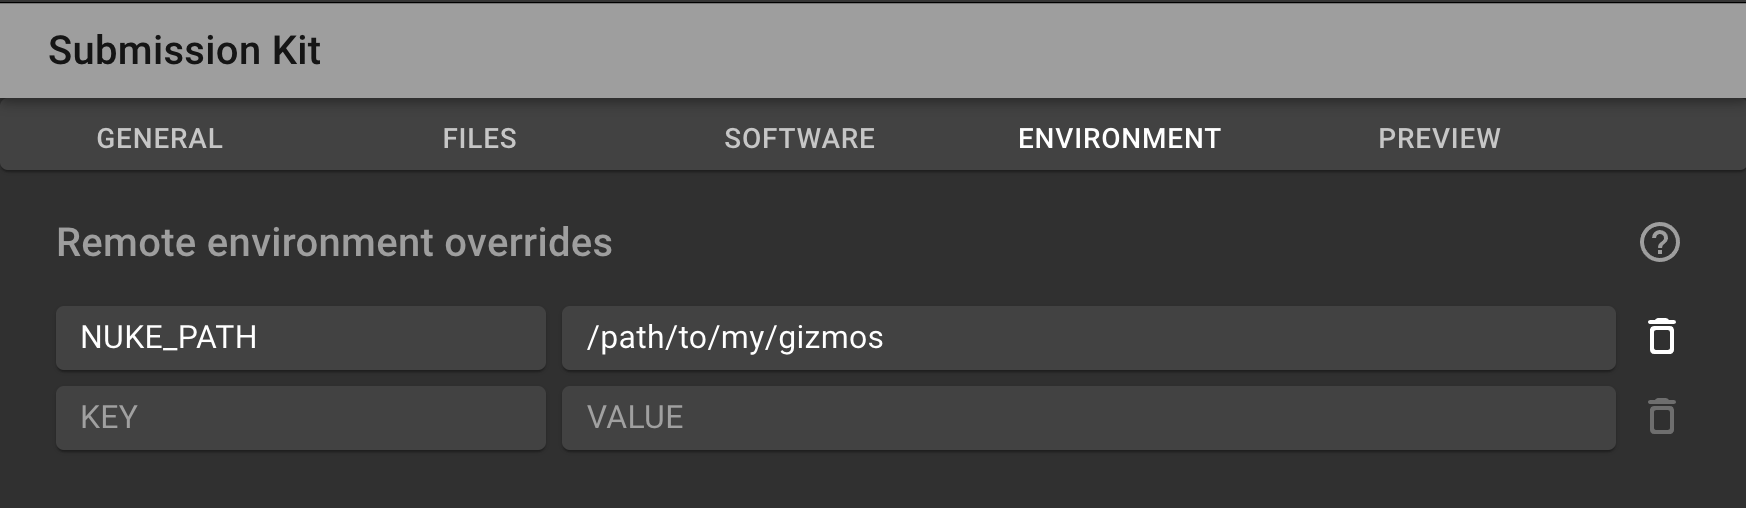
This page enables you to override environment variables on the render nodes and specify new values.
When selecting software versions in the Software tab, several environment variables are made available to the render nodes.
By defining an override, any existing value for the same variable name is overridden.
In the screenshot above, the variable that points to the user's Nuke gizmos location directory has been added to NUKE_PATH. This means that if there were already an entry for NUKE_PATH, it would disappear. If you want to append a value to an existing variable, you'll need to copy the value first, then append or prepend your new value separated by a colon.
Example: NUKE_PATH : "/opt/thefoundry/nuke/11/nuke11.3v5:/path/to/my/gizmos"
If you want to remove a variable, simply leave the value field blank or empty.
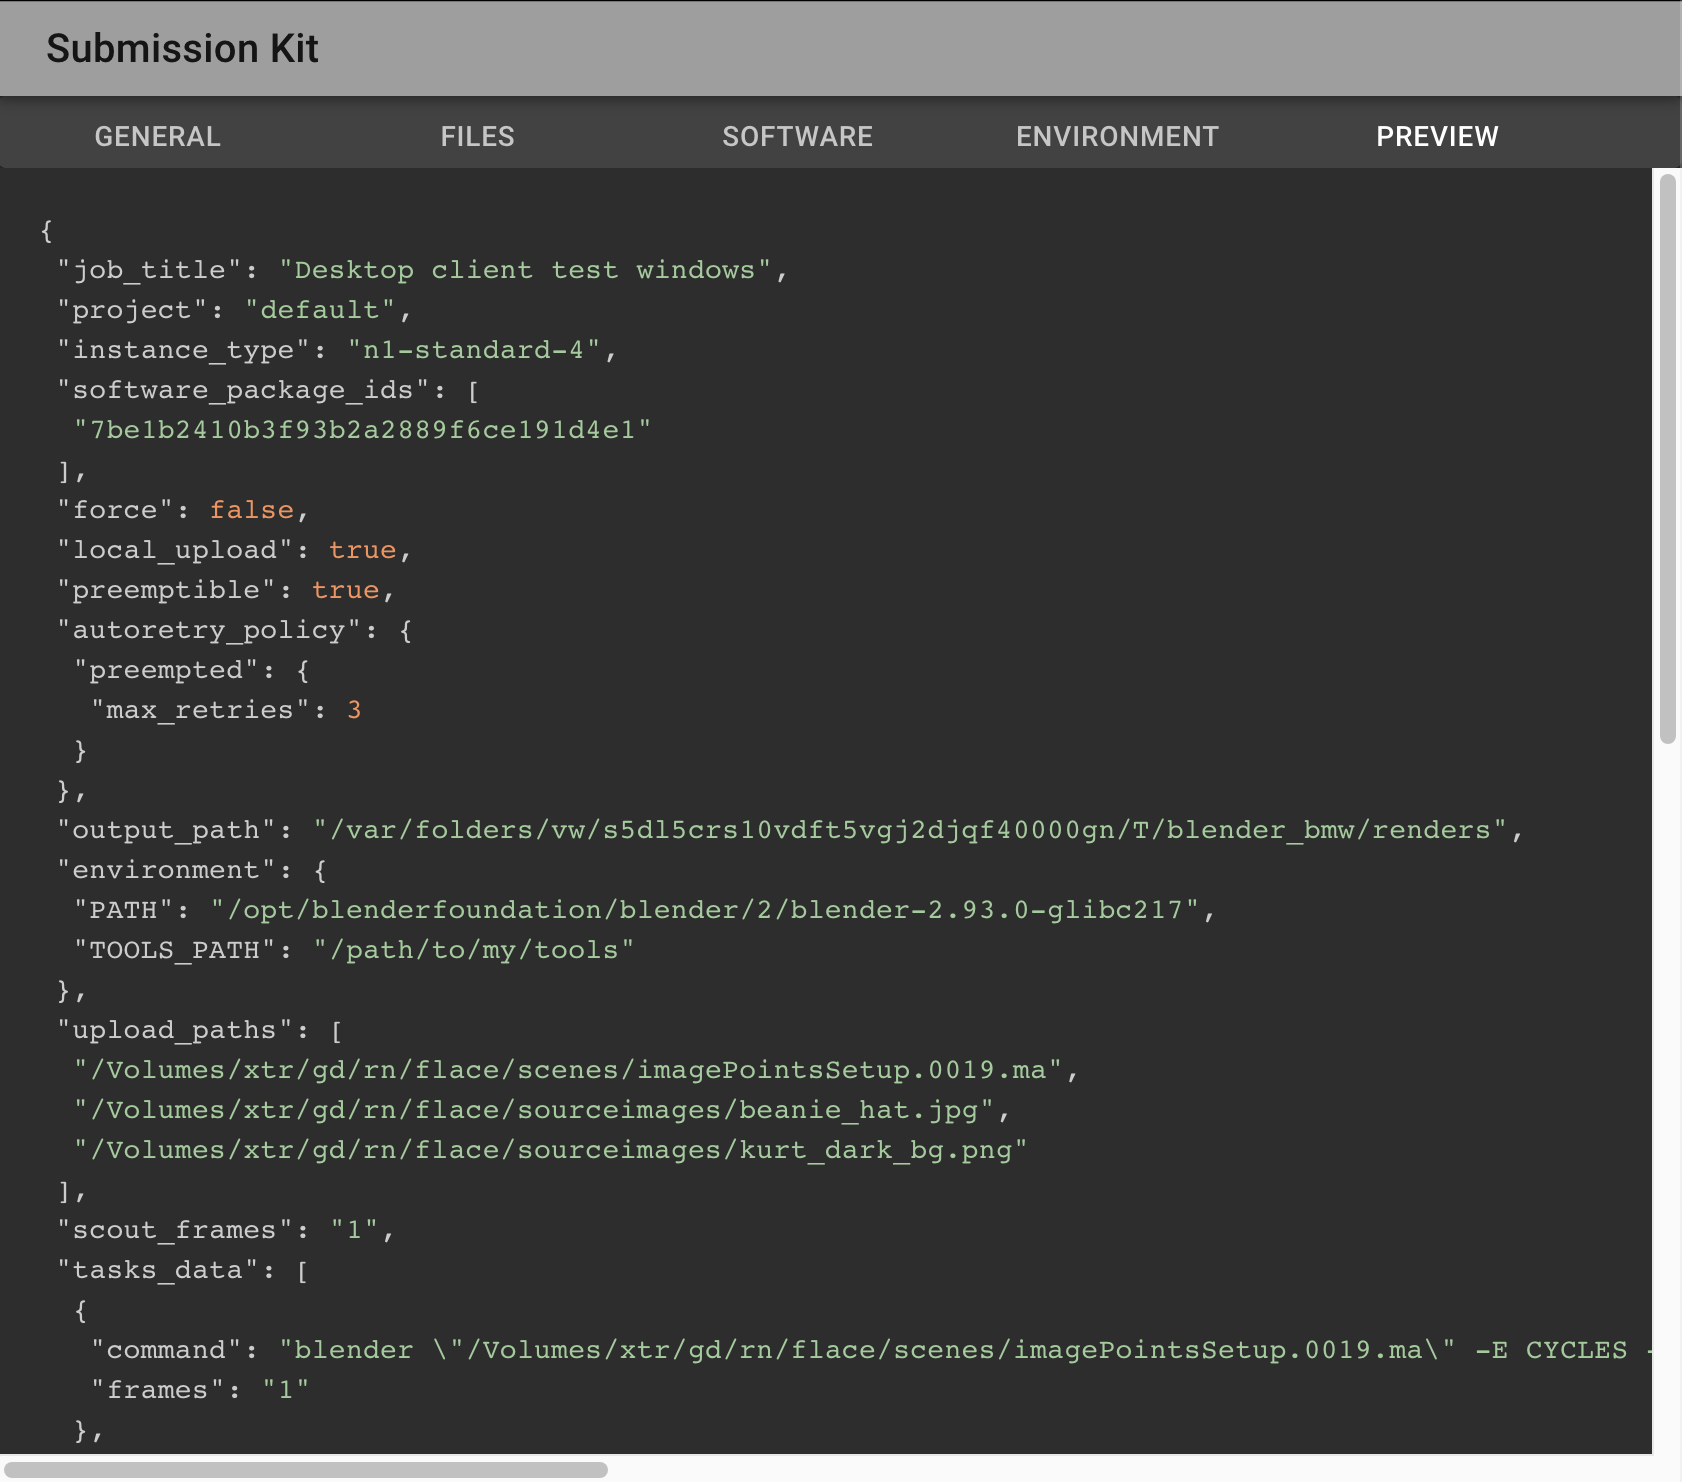
Preview
The Preview tab displays the raw submission object and is automatically updated as you populate the fields in the other four tabs. You can return to this tab at any point to confirm that your submission looks correct.
Submit
Simply press the Submit button in the bottom-right corner when you are ready to submit.
You should see some activity in the status bar (the thin bar at the bottom of the application window). If you click the small icon on the left side of the status bar, you'll see the whole log, which allows you to identify errors, if any.
If the submission is successful, you'll see a link to the job in Conductor's web UI.

3 dots menu
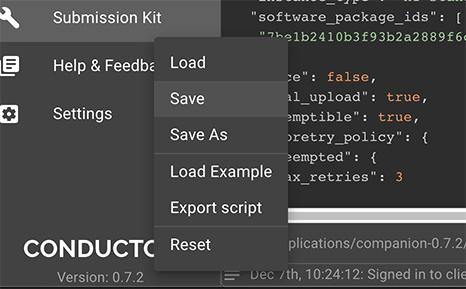
Click the icon in the bottom left with the three vertical dots (located above the status bar).
- Select Save As to choose a location to save the current submission state as a recipe in JSON format.
- Select Load to choose a previously saved submission recipe.
- Select Save to overwrite the currently loaded recipe.
- Select Load example to choose one of the preset example submission recipes.
- Select Export script to export a resolved JSON script and Python script runner that you can use submit from the command line. This allows you to make adjustments that may not be available through the UI. It's also useful for developers who want to understand the API.